Water pressure reducing valves (PRVs), also known as pressure regulators, serve as critical safeguards in residential and commercial plumbing systems. These devices automatically reduce incoming water pressure from the municipal supply to safer, more manageable levels that protect fixtures, appliances, and piping from damage. Understanding how to properly adjust these valves empowers homeowners and facility managers to optimize their water systems for both performance and longevity.
Table of Contents
ToggleUnderstanding Water Pressure and Why It Matters
Municipal water systems often deliver water at pressures ranging from 80 to 150 PSI or higher to ensure adequate flow reaches upper floors in tall buildings and distant properties. While this high pressure serves the distribution network well, it creates problems within individual buildings.
Excessive water pressure accelerates wear on fixtures, causes toilets to run continuously, creates water hammer that damages pipes, shortens appliance lifespan, and wastes water. Most plumbing fixtures and appliances are designed to operate optimally between 40 and 60 PSI, with 50 PSI representing an ideal target for most residential applications.
A pressure reducing valve installed where the main water line enters the building automatically throttles incoming pressure down to this safer range, regardless of fluctuations in supply pressure. Properly adjusted PRVs extend the life of water heaters, washing machines, dishwashers, and all plumbing fixtures while reducing water consumption and utility costs.
Recognizing When Adjustment Is Needed
Several symptoms indicate your pressure reducing valve may require adjustment:
Pressure Too High:
- Water hammer (banging pipes when fixtures close quickly)
- Toilets running continuously or taking long to fill
- Leaking faucets or fixtures
- Shortened water heater lifespan
- Excessive water consumption
- Spray from faucets difficult to control
Pressure Too Low:
- Weak flow from showerheads and faucets
- Washing machines or dishwashers taking excessive time to fill
- Difficulty operating multiple fixtures simultaneously
- Upper floors receiving inadequate pressure
- Lawn irrigation systems underperforming
Testing the actual pressure with a gauge provides definitive information rather than relying solely on symptoms, as multiple issues can produce similar effects.
Tools and Materials Required
Before beginning adjustment, gather the necessary tools and equipment:
Essential Tools:
- Water pressure gauge (typically threads onto a hose bibb or washing machine connection)
- Adjustable wrench or channel locks
- Flathead or Phillips screwdriver (depending on adjustment mechanism)
- Flashlight or work light
- Bucket and towels (for any minor drips)
Optional but Helpful:
- Pipe wrench (if valve removal becomes necessary)
- Plumber’s tape (Teflon tape)
- Notebook and pen (to record pressure readings)
- Camera phone (to document valve settings before adjustment)
Most water pressure gauges cost between $10 and $30 and represent an excellent investment for any homeowner, providing valuable information for troubleshooting numerous plumbing issues beyond PRV adjustment.
Locating Your Pressure Reducing Valve
The PRV typically installs on the main water line shortly after it enters the building, usually before the water meter or immediately after it. Common locations include:
In Homes:
- Basement or crawlspace near the foundation wall
- Utility room where the main line enters
- Near the water meter
- Sometimes in a ground-level box outside the home
In Commercial Buildings:
- Mechanical room or utility space
- Near main water service entrance
- Sometimes in below-grade vault or meter room
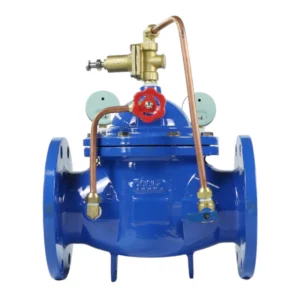
The pressure reducing valve resembles a bell-shaped or cylindrical device, typically brass or bronze, with an adjustment mechanism (screw or bolt) protruding from the top or side. It’s usually 3/4 inch to 2 inches in diameter for residential applications, larger for commercial installations.
If you cannot locate your PRV, not all properties have them installed. Older homes particularly may lack this protection. If high pressure problems exist but no PRV is present, installation by a licensed plumber should be considered.
Safety Precautions and Preparation
Before beginning any adjustment work, take appropriate safety measures:
Notify Occupants: Inform everyone in the building that you’ll be adjusting water pressure. They should avoid using water during testing and adjustment to ensure accurate readings.
Identify Shutoff Valve: Locate the main water shutoff valve before the PRV. You likely won’t need to close it for simple adjustments, but knowing its location is essential if problems arise.
Check for Leaks: Inspect the PRV and surrounding connections for existing leaks before adjustment. Adjusting a damaged valve may worsen leaks or cause failure.
Prepare for Drips: Have towels and a bucket ready. Some valve designs may weep slightly during adjustment, particularly older units.
Document Current Settings: Take photos of the valve and its adjustment screw position before making any changes. If adjustment goes wrong, you can return to the starting point.
Step-by-Step Adjustment Procedure
Step 1: Measure Current Pressure
Accurate pressure measurement provides your baseline and guides adjustment:
Locate a Test Point: The best test location is a hose bibb (outdoor faucet) or the washing machine cold water connection. These typically provide unobstructed access to system pressure without flow restrictors that affect some fixtures.
Attach the Pressure Gauge: Thread the gauge onto the hose bibb or washing machine connection. Most gauges have standard hose thread connections. Ensure a tight, hand-threaded connection to prevent leaks during testing.
Open the Valve Fully: Turn the hose bibb or washing machine valve to full open position.
Ensure No Water Flow: Make certain no other fixtures are running anywhere in the building. Any water flow affects the pressure reading, providing inaccurate results.
Read the Gauge: Allow a few seconds for the pressure to stabilize, then note the reading. Record this number—it represents your starting point.
Test at Multiple Locations: For comprehensive assessment, test at several locations throughout the building, particularly at different elevations if it’s a multi-story structure. Upper floors naturally read slightly lower due to elevation head loss (approximately 0.5 PSI per foot of elevation).
Step 2: Determine Target Pressure
Based on your system requirements, establish the target pressure:
Standard Residential: 45-60 PSI (50 PSI optimal for most homes)
Multi-Story Buildings: Higher pressures (60-70 PSI) may be necessary to ensure adequate upper floor delivery
Sensitive Appliances: Some high-efficiency fixtures prefer lower pressures (40-45 PSI)
Local Code Requirements: Some jurisdictions mandate specific pressure ranges—check local plumbing codes
Consider the highest fixture in the building when setting pressure. A second-floor bathroom 15 feet above the PRV loses about 7 PSI due to elevation, so setting the PRV to 50 PSI delivers only 43 PSI to upper fixtures.
Step 3: Access the Adjustment Mechanism
PRV adjustment mechanisms vary by manufacturer and model, but most follow similar principles:
Screw-Type Adjustment: Most common design features a threaded adjustment screw or bolt protruding from the top or side of the valve body. This screw may have a locknut that must be loosened before adjustment.
Tool-Less Designs: Some modern PRVs include hand-adjustable knobs or levers requiring no tools.
Protected Adjustments: Higher-end models may have the adjustment mechanism under a protective cap that unscrews for access.
Identify Adjustment Direction: Most PRVs follow the standard “righty-tighty, lefty-loosey” convention:
- Turning the adjustment screw clockwise (tightening) increases pressure
- Turning counter-clockwise (loosening) decreases pressure
Some valves have directional arrows or markings indicating adjustment direction. If yours doesn’t, the standard convention applies unless manufacturer documentation states otherwise.
Step 4: Make Initial Adjustment
Begin with conservative adjustments:
Loosen Locknut (if present): If your PRV has a locknut securing the adjustment screw, loosen it just enough to allow the screw to turn, but don’t remove it completely.
Turn Slowly: Make small adjustments—typically 1/4 to 1/2 turn at a time. Pressure reducing valves are sensitive, and small adjustments produce significant pressure changes.
To Increase Pressure: Turn the adjustment screw clockwise. Each quarter-turn typically increases pressure by 3-5 PSI, though this varies by valve design.
To Decrease Pressure: Turn the adjustment screw counter-clockwise. Again, small increments prevent overshooting the target.
Wait for Stabilization: After each adjustment, wait 10-15 seconds for the valve to respond and pressure to stabilize throughout the system.
Step 5: Test and Verify
After each adjustment increment:
Check Pressure Gauge: Read the gauge at your test location to see the effect of the adjustment.
Test Water Flow: Open a few fixtures to confirm adequate flow and that pressure responds appropriately.
Run High-Demand Fixtures: Test the shower, flush a toilet, or run the washing machine to ensure pressure remains stable during use.
Check Multiple Locations: If initial testing was at one location, verify pressure at other test points to ensure consistent results throughout the system.
Step 6: Fine-Tune as Needed
Achieving the perfect pressure usually requires multiple adjustment iterations:
Incremental Approach: Continue making small adjustments, testing after each change, until the pressure gauge reads at your target level.
Account for Variation: Pressure may fluctuate slightly based on municipal supply variations. Aim for a setting that keeps pressure within acceptable range during these normal fluctuations.
Balance Competing Needs: If upper floors need more pressure but ground floor fixtures perform better at lower pressure, find a compromise setting that adequately serves all areas, possibly favoring upper floors since they face the greatest challenge.
Consider Peak Demand: Test during periods of high water usage to ensure the system maintains adequate pressure when multiple fixtures operate simultaneously.
Step 7: Secure and Finalize
Once you’ve achieved the target pressure:
Tighten Locknut: If your PRV has a locknut, tighten it firmly while holding the adjustment screw to prevent it from turning. The locknut prevents the setting from changing due to vibration or inadvertent contact.
Document Final Setting: Record the final pressure reading and take photos of the adjustment screw position for future reference.
Monitor Initially: Check pressure daily for the first week to ensure the setting remains stable and no issues develop.
Remove Test Gauge: Unthread the pressure gauge from the test location and restore normal operation.
Troubleshooting Common Adjustment Issues
Sometimes adjustment doesn’t proceed smoothly. Here are solutions to common problems:
Adjustment Has No Effect
Possible Causes:
- The adjustment mechanism has become seized or corroded
- The valve diaphragm or internal components have failed
- You’re adjusting the wrong component (some valve designs have multiple adjustment points)
- The valve is installed backwards (incorrect flow direction)
Solutions: Try applying penetrating oil to the adjustment threads and waiting several hours before attempting adjustment again. If this doesn’t work, the valve likely requires replacement rather than adjustment.
Pressure Won’t Decrease Below a Certain Point
Possible Causes:
- The adjustment screw has reached its minimum position
- Internal spring has lost tension
- The valve is partially obstructed with sediment
Solutions: If the adjustment screw bottoms out before achieving desired pressure, the valve may be undersized for your application or needs replacement. Sediment can sometimes be cleared by opening the system test port (if equipped) to flush debris.
Pressure Fluctuates Significantly
Possible Causes:
- Worn internal components
- Water hammer in the system
- Pressure surges from municipal supply
- Inadequate valve sizing for flow demand
Solutions: Install water hammer arrestors at fixtures that close abruptly. If municipal supply varies wildly, you may need a more sophisticated PRV with better regulation characteristics. Significant fluctuation often indicates a failing valve requiring replacement.
Pressure Changes Shortly After Adjustment
Possible Causes:
- Locknut not tightened (setting drifts)
- Thermal expansion effects (especially with closed systems)
- Valve nearing end of service life
Solutions: Ensure the locknut is properly secured. If you have a closed water system (with check valves preventing backflow), thermal expansion from the water heater may require installation of an expansion tank to stabilize pressure.
Adjustment Screw Won’t Turn
Possible Causes:
- Corrosion has seized the threads
- Locknut is still engaged
- Cross-threading or damage
Solutions: Verify the locknut is fully loosened. Apply penetrating oil and allow it to work overnight. Use moderate force—don’t force a stuck adjustment screw as you may damage internal components. If the screw remains frozen, professional replacement is likely necessary.
When Professional Service Is Required
While PRV adjustment is generally straightforward, certain situations call for professional plumbing service:
Valve Failure: If adjustment has no effect or the valve leaks significantly, replacement by a licensed plumber is necessary.
System Design Issues: If pressure problems persist after proper adjustment, underlying issues like undersized piping, closed system problems, or inappropriate valve selection may require professional diagnosis.
Code Compliance: Some jurisdictions require licensed plumbers to install or service PRVs. Check local requirements.
Multiple Zones: Complex properties with multiple pressure zones or booster systems need professional design and adjustment.
Commercial Applications: Large commercial or industrial systems should be serviced by qualified technicians familiar with commercial equipment.
Safety Concerns: If you’re uncomfortable working with plumbing systems or uncertain about any procedure, professional service provides peace of mind.
Maintenance and Long-Term Care
Pressure reducing valves require minimal maintenance but benefit from periodic attention:
Annual Pressure Checks: Test system pressure yearly to detect gradual changes indicating valve wear or municipal supply changes.
Visual Inspections: Periodically inspect the PRV for leaks, corrosion, or damage. Check that adjustment mechanisms remain accessible and functional.
Listen for Abnormal Sounds: Whistling, humming, or chattering from the PRV area indicates potential problems requiring attention.
Typical Lifespan: Quality PRVs typically last 10-15 years with proper installation and reasonable water quality. Plan for eventual replacement rather than continued adjustment of failing units.
Water Quality Matters: Sediment, mineral content, and corrosive water chemistry accelerate wear. Consider filtration or water treatment if quality is poor.
Keep Documentation: Maintain records of pressure readings, adjustment dates, and any service performed for future reference.
Understanding Pressure Reducing Valve Limitations
PRVs solve many water pressure problems but have limitations to understand:
Flow Capacity: Each PRV has a maximum flow rate. Undersized valves cause pressure drop during high demand. Ensure your valve is properly sized for peak flow requirements.
Temperature Limits: Standard PRVs are designed for cold water service (typically up to 100°F). Hot water applications require special high-temperature valves.
Accuracy: Most residential PRVs maintain pressure within ±5 PSI of the set point under normal conditions. Precision applications may require more sophisticated regulators.
Doesn’t Increase Pressure: PRVs only reduce incoming pressure—they cannot boost pressure if municipal supply is already low. Low-pressure situations require booster pumps.
Maintenance Requirements: While generally reliable, all mechanical devices eventually wear and require replacement. Factor this into long-term planning.
Optimizing Your Home’s Water Pressure System
Beyond simple PRV adjustment, consider these additional measures for optimal performance:
Install Pressure Gauge: Permanent installation of a pressure gauge on the system provides continuous monitoring without testing procedures.
Add Expansion Tank: Closed systems (with backflow preventers) benefit from expansion tanks that accommodate thermal expansion from water heating, stabilizing pressure.
Water Hammer Arrestors: Install arrestors near fixtures that close abruptly (washing machines, dishwashers) to eliminate pipe banging and protect the system.
Regular Filter Maintenance: If you have whole-house filtration, maintain filters properly as clogged filters create pressure drop that compounds PRV-related issues.
Zone Pressure Regulation: Large homes or those with extreme elevation differences may benefit from multiple PRVs creating pressure zones optimized for different areas.
Pressure Boost Systems: If municipal pressure is marginal and the PRV must be set high to serve upper floors, consider a booster pump system for better control.
Conclusion: Mastering Pressure Control
Adjusting a water pressure reducing valve represents one of the more accessible and impactful maintenance tasks homeowners and facility managers can perform. Understanding your system’s pressure, properly adjusting the PRV, and maintaining appropriate pressure levels protects your investment in plumbing fixtures and appliances while reducing water waste and utility costs.
The key to success lies in methodical approach: accurate measurement, small incremental adjustments, thorough testing, and proper documentation. With these principles and the detailed steps outlined in this guide, you can confidently optimize your water pressure system for both performance and longevity.
Remember that while adjustment is straightforward for functioning valves, failed or failing units require replacement rather than adjustment. Regular monitoring and timely professional service when needed ensure your pressure reducing valve continues protecting your plumbing system for years to come. Properly adjusted water pressure represents one of the foundations of a well-functioning, efficient, and long-lasting plumbing system.