For valves and other critical industrial components, the saying “beauty is only skin-deep” is absolutely true. You cannot verify the quality of a valve simply by looking at it—after all, Superman and his X-ray vision do not exist. Many defects remain invisible to the naked eye, which is why manufacturers rely on Non-Destructive Examination (NDE), a group of inspection methods that use physical and chemical principles to evaluate internal and surface conditions without damaging the part.
The American Society for Nondestructive Testing (ASNT) defines NDT/NDE as:
“The determination of the physical condition of an object without affecting its ability to fulfill its intended function.”
This makes NDE the perfect tool for valve manufacturers who must verify component quality while still being able to use those parts in production.
Table of Contents
ToggleA Brief History of NDE in Valve Manufacturing
NDE has been used on valve components since the late 1930s, but its widespread adoption was driven by World War II and later by the expansion of the nuclear industry.
Admiral Hyman Rickover, known as the father of the “Nuclear Navy,” established strict quality requirements for the construction of the USS Nautilus. These standards were later adopted by multiple valve manufacturers supplying critical, high-risk services.
In the mid-1950s, the Manufacturers Standardization Society (MSS) began developing NDE standards specifically for valves. These standards heavily influenced the creation of ANSI/ASME B16.34 – Valves: Flanged, Threaded, and Welding End, published in 1973. Even today, B16.34 remains one of the most frequently referenced NDE documents in the valve industry.
Though B16.34 originally intended NDE as a way to upgrade pressure ratings based on inspection performance, its criteria are now widely applied in many other applications requiring enhanced quality control.
Types of NDE Methods
NDE techniques are generally grouped into two categories:
1. Volumetric Methods
These inspect the entire thickness of a component and can identify internal defects.
2. Surface Methods
These detect discontinuities that break the surface of the material.
Below are the most commonly used NDE techniques in valve manufacturing.
Radiographic Testing (RT)
Radiography is a volumetric inspection technique widely used for casting defects and weld evaluation. It is extremely useful for detecting shrinkage, inclusions, voids, and lack of penetration in welds.
However, X-ray interpretation can be challenging. Many foundries—especially low-cost producers—have generated inconsistent results over the past 20 years because interpreting casting radiographs requires extensive training.
ASME publishes reference radiographs showing defect types and severity levels (from Level 1 – no defects to Level 5 – severe defects). B16.34 specifies the exact critical areas of a valve body or bonnet that must be evaluated and graded.
To avoid missing defects outside these critical areas, many end users now require 100% RT on pressure-containing parts, eliminating the risk of overlooking harmful discontinuities.
Ultrasonic Testing (UT)
UT is another major volumetric NDE technique, especially effective for forged components and weld inspections.
UT works similarly to medical ultrasound: a probe sends sound waves into the material and displays results on a screen in real time.
While UT is excellent for forgings, it is not usually preferred for castings because the ultrasonic beam reflects off crystal boundaries, creating noisy results. Sharp corners or abrupt geometry changes can also cause false signals.
Despite these limitations, UT remains the best choice for examining internal integrity in forged valve components.
Magnetic Particle Testing (MT)
MT is a surface or near-surface inspection method used only on ferromagnetic materials such as carbon steel and martensitic stainless steel.
The process involves:
Applying iron powder to the clean surface
Magnetizing the area using an electric yoke or induced current
Observing how powder gathers around surface-breaking or slightly subsurface defects
MT is often used alongside RT to confirm whether surface-connected defects correspond to volumetric indications.
Dye Penetrant Testing (PT)
PT is a simple yet highly effective surface examination method suitable for any metal, regardless of magnetic properties. It is ideal for detecting surface cracks, porosity, or other discontinuities.
The process includes:
Cleaning the surface
Applying liquid penetrant and allowing dwell time
Removing excess penetrant
Applying developer
Interpreting red (or fluorescent) indications where penetrant seeps out of cracks
Compared with UT and RT, MT and PT are easier to learn and are commonly used in routine production quality control.
Hardness Testing
Although not always classified as NDE, hardness testing is frequently used to verify that components meet required mechanical properties or heat-treatment conditions (e.g., annealing, stress relief).
The most common scales in the valve industry are:
Rockwell C (RC)
Brinell (BHN)
Hardness limits are especially important for H₂S service, where carbon steel hardness is often restricted to maximum RC 22.
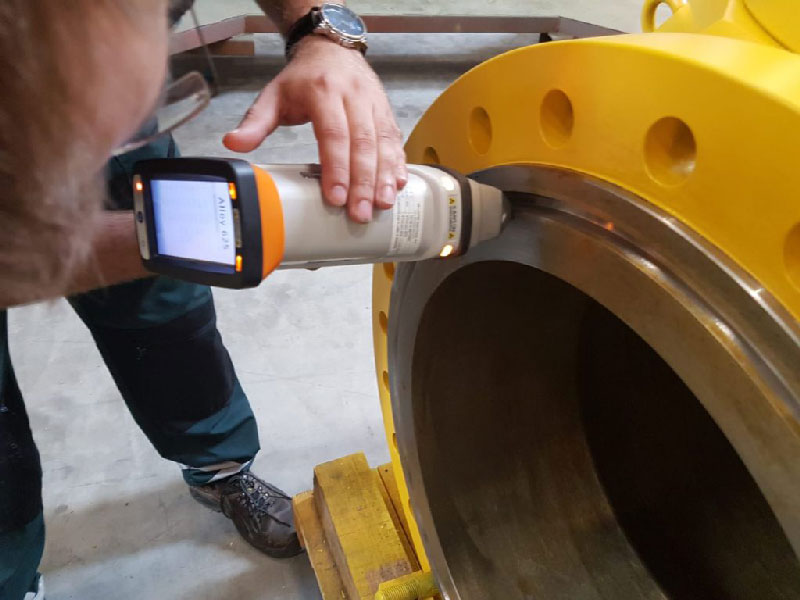
Positive Material Identification (PMI)
PMI verifies the chemical composition of metal components. Common technologies include:
X-Ray Fluorescence (XRF)
Portable, widely used, good for alloy identification but cannot detect carbon content.
Laser-Induced Breakdown Spectroscopy (LIBS)
More accurate than XRF and capable of detecting carbon—especially useful for verifying carbon steel grades.
Optical Emission Spectroscopy (OES)
Highly accurate and capable of measuring carbon content but generally not handheld and slightly destructive due to surface melting.
PMI is essential for ensuring materials match specifications, especially after outsourcing to multiple suppliers.
NDE Challenges in Castings and Welds
Casting Issues
Over the past 25 years, the global supply chain has seen a surge in low-cost castings. This has increased concern about:
shrinkage defects
inclusions
process-related imperfections
Not all defects are harmful. Some lower-severity shrinkage or inclusions rarely affect performance in general service valves. The misunderstanding stems from applying strict nuclear-grade B16.34 criteria to all valves, even when unnecessary.
Welding Issues
Weld quality is critical in valves—whether weld overlays or pressure-retaining welds.
RT and UT are the primary tools for verifying:
fusion
penetration
porosity
inclusions
PT and MT are routinely used to detect surface-breaking weld defects such as cracks or incomplete fusion.
Common NDE Standards Used for Valve Components
Radiographic Testing
MSS SP-54
ASME BPVC Section V, Article 2
ANSI/ASME B16.34
ASME BPVC Section VIII, Appendices 4 & 7
Magnetic Particle Testing
MSS SP-53
ASME BPVC Section V, Article 7
ANSI/ASME B16.34
ASME BPVC Section VIII, Appendix 6
Dye Penetrant Testing
MSS SP-93
ASME BPVC Section V, Article 6
ANSI/ASME B16.34
ASME BPVC Section VIII, Appendix 8
Ultrasonic Testing
MSS SP-94
ASME BPVC Section V, Article 4
ANSI/ASME B16.34
ASME BPVC Section VIII, Appendix 12
Positive Material Identification (PMI)
MSS SP-137
API 578
These standards form the basis for consistent, reliable, and globally recognized valve-quality inspections.
Conclusion
NDE testing plays an indispensable role in verifying the integrity, safety, and reliability of valve components. As long as valves continue to be manufactured using castings, forgings, and weldments, the industry will rely on robust NDE standards to ensure that quality extends far beyond the surface.
