A foot valve in a deep well is essential for keeping the pump primed and preventing water from draining back into the well. When the foot valve begins to fail, you might notice issues such as:
Pump losing prime
Excessive air in the water lines
Long pump startup time
Falling pressure after pump shutoff
Pump running continuously
Because a deep-well foot valve is often 30–200 feet below ground, pulling the pipe to inspect it is difficult. Fortunately, there are several reliable ways to check the valve without removing it.
Table of Contents
Toggle1. Pressure Drop Test (Most Common Method)
Steps:
Turn off the pump.
Close any isolation valves on the discharge side.
Watch the pressure gauge on the pump system.
Results:
Pressure stays steady → Foot valve is holding and not leaking.
Pressure drops steadily → Water is leaking back through the foot valve.
This is the simplest and most effective non-invasive test for deep wells.
2. Pump-Prime Holding Test
Steps:
Prime the pump completely.
Turn off the pump.
Leave the system for several hours or overnight.
Results:
If the pump still has prime → The foot valve is good.
If the pump loses prime → Foot valve is leaking or suction pipe has an air leak.
This test takes longer but gives clear results.
3. Listening Test With a Pipe or Stethoscope
A leaking foot valve often causes water to run backward down the pipe after pump shutoff.
Steps:
Turn off the pump.
Place your ear near the well casing using:
A mechanic’s stethoscope
A long screwdriver
A length of metal pipe
Listen for gurgling or flowing water sounds.
Results:
No sound → Foot valve is likely sealed.
Water rushing backward → Foot valve is leaking.
This works especially well in steel-cased wells.
4. Vacuum Test on Suction Side (For Jet Pumps)
If you have a jet pump with accessible suction piping:
Steps:
Shut off the pump.
Connect a vacuum gauge to the suction line.
Apply vacuum using a hand pump.
Results:
Vacuum holds steady → Foot valve is sealing properly.
Vacuum drops → There is a leak—usually the foot valve.
This method is more precise and often used by professionals.
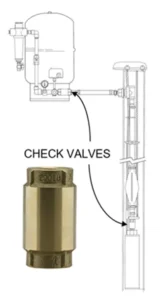
5. Flow Reversal Test (Advanced)
For systems with a check valve near the pump:
Steps:
Remove the check valve near the pump.
Observe water level in the suction pipe.
Results:
Water should stay in the pipe.
If water falls back rapidly, the foot valve is failing.
This is highly reliable but requires disassembling the top piping.
6. Pulling the Drop Pipe (Final Method)
If all tests confirm a leak, the last step is physical inspection:
Steps:
Lift the drop pipe using a pulley, tripod, or winch.
Inspect the foot valve for:
Corrosion
Worn flapper/poppet
Broken springs
Cracked or leaking screens
When to do this:
If pressure drops rapidly
If priming is impossible
If water contains sand or debris
This is the only way to confirm the exact mechanical failure.
Common Causes of Foot Valve Failure in Deep Wells
Corrosion (especially in steel valves)
Sand, silt, or debris lodged in the valve
Worn rubber seals
Weak springs
Cracked cage or housing
Air leaks in suction line above the valve
Tips for Extending Foot Valve Life in Deep Wells
Use stainless steel or brass for long-term durability
Install a well screen to keep debris away
Avoid rapid pump cycling
Inspect system pressure regularly
Replace the valve every 5–10 years depending on water quality
Conclusion
Checking a foot valve in a deep well can be done without pulling the pipe by using pressure tests, sound checks, vacuum tests, and prime-holding methods. If all tests point to leakage, it’s time to remove the drop pipe and inspect or replace the valve.