A pressure relief valve replacement is one of the simplest DIY water-heater repairs—but it’s also one of the most important for safety. If your T&P valve is leaking, stuck open, or constantly dripping, replacing it can prevent dangerous temperature and pressure buildup inside the tank.
This guide covers everything you need: when to replace it, tools required, safety steps, and a complete step-by-step replacement procedure.
Quick Answer
Difficulty: ★★☆☆☆ (Beginner-friendly)
Time required: 20–45 minutes
DIY cost: $15–$30 for the valve + Teflon tape
Professional cost: $150–$300
If the valve is leaking, won’t reset, or opens repeatedly, replacement is the safest and most cost-effective solution.
When to Replace a Water Heater Pressure Relief Valve
The T&P (Temperature & Pressure) valve should be replaced when:
✔ It constantly drips or leaks
Even after testing, the valve should seal completely. If not → replace.
✔ The valve won’t open during testing
A stuck or calcified valve is dangerous.
✔ It opens too frequently
This may indicate high pressure—but a worn valve can also cause false opening.
✔ Signs of corrosion or mineral buildup
White scale, rust, and heavy deposits prevent proper sealing.
✔ It’s older than 5–7 years
Most manufacturers recommend replacing every 5 years as preventative maintenance.
Tools and Materials Needed
Tools
Adjustable wrench
Bucket or hose (to drain water)
Screwdriver (if needed to remove discharge pipe)
Teflon tape (PTFE thread seal tape)
Pressure gauge (optional but useful)
Materials
New pressure relief valve
Commonly ¾” NPT
Rated 150 PSI / 210°F
Choose a high-quality brass valve
 Watts3/4″PressureReliefValve–PRODUCTLINKWatts 3/4″ Pressure Relief Valve
Safety Precautions (Important)
Before touching the valve:
1. Turn OFF power
Electric water heater: switch OFF the breaker
Gas water heater: turn gas control to “Pilot”
2. Allow the water to cool
Hot water can cause severe burns.
3. Shut off the cold-water supply
This prevents tank refilling.
4. Always test the valve after installation
Ensures the system is safe before returning to normal operation.
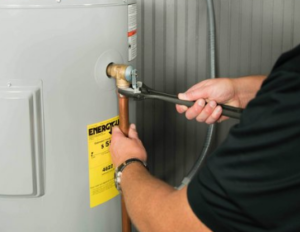
How to Replace a Water Heater Pressure Relief Valve (Step-by-Step)

1. Turn Off the Water Heater
Electric: flip breaker OFF
Gas: turn the gas control knob to Pilot or Off
This prevents the heating elements or burner from running while the tank is partially drained.
2. Turn Off the Cold Water Supply
Locate the cold-water shutoff valve above the heater and close it.
3. Drain the Tank Below the Valve Level
You don’t need to drain the entire tank—just enough to lower the water level below the valve opening.
How to drain:
Attach a hose to the drain valve at the bottom
Run it to a floor drain or bucket
Open the drain valve
Open a hot-water faucet to speed drainage
Once the water level drops below the T&P valve height, you’re ready.
4. Remove the Discharge Pipe
The discharge pipe directs hot water safely to the floor or drain.
Unscrew it from the valve using a wrench or by hand
Set it aside for reinstallation
5. Remove the Old Pressure Relief Valve
Use an adjustable wrench to loosen the valve counterclockwise.
If it’s stuck:
Apply penetrating oil
Tap lightly with a wrench
Avoid twisting the tank fittings
Remove the valve completely.
6. Prepare the New Valve
Wrap the threads with Teflon tape:
4–6 wraps clockwise around the threads
Ensure even coverage
Do not cover the valve port
This ensures a tight, leak-free seal.
7. Install the New Valve
Screw the new valve into the tank by hand
Tighten with a wrench until snug
Do not overtighten (can damage tank threads)
Reattach the discharge pipe to the new valve.
8. Restore Water & Power, Then Test
Turn on cold-water supply
Let the tank fill
Open a hot-water faucet to purge air
Check for leaks
If leaks appear around the valve threads → tighten slightly.
Turn power or gas back on
Once the tank is full, restore heating.
Test the valve
Lift the lever briefly:
Hot water should flow out
Releasing the lever should reseal the valve completely
You’re done!
Common Mistakes to Avoid
❌ Not draining enough water → Water gushes out when removing valve
❌ Overtightening the new valve → Damages tank threads
❌ Using low-quality or incorrect-rating valves
❌ Not reinstalling a discharge pipe (unsafe and often illegal)
❌ Turning heater on before tank is full (can burn heating elements)
Troubleshooting After Replacement
Valve still leaking?
Likely pressure or thermal expansion, not the valve.
Valve won’t seal after test?
Replace again—defective valves do occur.
Valve opens randomly?
Check:
Home water pressure (>80 PSI)
Thermal expansion tank condition
Thermostat overheating
Cost Breakdown
DIY Cost
New relief valve: $15–$30
Teflon tape: $1–$3
Total: $20–$35
Professional Cost
Labor: $100–$250
Valve: $15–$30
Total: $150–$300
Why DIY makes sense
Replacing a T&P valve is one of the safest and simplest water-heater repairs. Doing it yourself can save $120–$250.
Watts3/4″PressureReliefValve–PRODUCTLINKWatts 3/4″ Pressure Relief Valve
Valve Selection Guide (Choosing the Right Pressure Relief Valve)
1. Pressure Rating
Standard residential rating:
150 PSI / 210°F
Never install a lower-pressure valve.
2. Size
Most water heaters use:
¾” NPT thread
Check the old valve or heater label to confirm.
3. BTU Requirements
For gas tanks, choose a T&P valve with a BTU rating equal to or greater than the water heater’s input.
4. Build Quality
Choose:
Solid brass body
CSA or ASME certification
Corrosion-resistant components
High-quality valves last longer and prevent nuisance opening.
Watts3/4″PressureReliefValve–PRODUCTLINKWatts 3/4″ Pressure Relief Valve
FAQ
How often should I replace a water heater relief valve?
Every 5 years or whenever it shows signs of leaking, sticking, or corrosion.
Is it safe to cap or plug a leaking relief valve?
Absolutely not. This can cause the tank to explode.
Can I reuse the old discharge pipe?
Yes, if it’s undamaged and fits the new valve. Replace if corroded.
Does replacing the valve fix all leaks?
No—if high pressure or thermal expansion is the root cause, it will continue forcing the valve to open.