A foot valve is a type of check valve installed at the bottom of a suction pipe in pumping systems. Its job is to maintain prime, prevent backflow, and ensure water flows only in one direction—from the source to the pump.
If a foot valve fails, your pump may lose prime, run dry, or struggle to maintain pressure. Testing the valve regularly helps identify problems early and prevent pump damage.
This guide explains how to test a foot valve using simple tools and step-by-step procedures.
Table of Contents
ToggleCommon Signs Your Foot Valve Needs Testing
Before testing, check for symptoms of foot valve failure:
Pump loses prime frequently
Pump takes a long time to build pressure
Water drains back into the well or reservoir
Visible air bubbles in the suction line
Reduced flow or unstable pressure
Pump runs continuously or cycles rapidly
If you see any of these issues, proceed with the tests below.
How to Test a Foot Valve (Step-by-Step)
Method 1: Visual Inspection and Manual Check
Turn off power to the pump.
Remove the suction line from the water source.
Physically inspect the foot valve for:
Debris
Rust or corrosion
Damaged screen
Stuck or worn-out flapper or poppet
Try blowing air through the valve:
Air should flow only one direction.
If air passes both ways, the valve is faulty.
This basic test quickly shows whether the valve seals properly.
Method 2: Water-Holding (Backflow) Test
This is the most accurate test without special equipment.
Steps:
Remove the foot valve from the suction pipe.
Attach a small vertical pipe or hose to the outlet side.
Fill the pipe with clean water.
Watch the water level:
If water stays in the pipe, the valve is sealing correctly.
If water slowly drains, the foot valve is leaking.
This test measures leak-back and shows whether the valve can maintain prime.
Method 3: Suction Test (Installed Valve)
If you cannot remove the valve:
Prime the pump and the suction line.
Close all downstream valves (isolation valves).
Turn off the pump.
Observe the pressure gauge:
Pressure holds steady → foot valve is good.
Pressure drops → valve is leaking back.
This method tests the valve without removing it from the well or water source.
Method 4: Vacuum Test (Advanced)
If you have a vacuum pump or gauge:
Connect the vacuum gauge to the suction line.
Apply vacuum with a hand pump.
Monitor the needle:
Vacuum holds → tight seal
Vacuum drops → foot valve leakage
This method is often used by well technicians for accurate diagnostics.
What to Do If the Foot Valve Fails
If your tests show leakage or mechanical issues:
✅ Clean the valve
Remove debris
Clean the screen and internals
Flush the flapper or poppet
✅ Repair if possible
Replace the flapper
Replace springs or seals
✅ Replace the valve
If it still leaks after cleaning, replacement is the best option. A worn or corroded foot valve will fail again even if repaired.
Tips for Preventing Foot Valve Failure
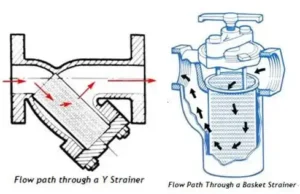
Install a strainer or ensure the built-in screen is intact.
Avoid pumping from muddy or sandy water sources.
Use corrosion-resistant materials (stainless steel, brass, or PVC).
Test your system annually.
Keep the suction line airtight.
Conclusion
Testing a foot valve is essential for maintaining pump efficiency and preventing loss of prime. Whether using a simple manual test or a more accurate backflow or vacuum test, diagnosing a faulty foot valve early helps avoid pump damage and costly downtime.