The hydraulic control valve is the central nervous system of any hydraulic machinery, directing pressurized fluid to actuators (cylinders and motors) to perform work. When a valve component degrades, the entire system suffers from slowness, weakness, or overheating. Mastering hydraulic control valve repair is essential for minimizing downtime and restoring the precision and power of equipment like tractors, backhoes, and loaders.

This guide provides a systematic process for hydraulic valve rebuild, covering common failure points, the steps for disassembly, and the critical role of the hydraulic control valve repair kit.
1. Overview of Hydraulic Control Valves
While designs vary, most hydraulic control valves achieve flow control through a primary mechanism:
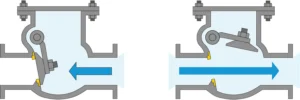
Spool Valves (Directional Control Valves): These use a cylindrical piston (the spool) that slides horizontally within a precisely bored valve body. The spool’s position directs fluid from the inlet to various outlet ports, controlling the movement (up/down, forward/backward) of a cylinder or motor.
Loader Valves: These are specialized directional control valves often featuring built-in relief valves and detents, designed specifically to manage the complex, high-flow demands of front-end loaders and similar machinery.
2. Common Symptoms That Mean Your Hydraulic Valve Needs Repair
A failing valve rarely stops working instantly. Instead, it exhibits symptoms of inefficiency:
Slow or Weak Cylinder Movement: The machine struggles to lift loads it previously handled easily. This is usually caused by internal leakage around the spool, resulting in pressure loss.
Spool Sticking: The control lever is difficult to move, or the cylinder continues to drift/move even after the lever is released. This points to friction caused by scored spools or tight seals.
External Leaks: Visible oil dripping from the valve body, often around the spool ends or mounting points. This indicates failed O-rings, seals, or dust caps.
Overheating: Constant internal leakage converts pressurized energy into heat, leading to rapid oil temperature increase.
3. Causes of Hydraulic Valve Failure
Identifying the root cause is vital, as simply installing a new hydraulic control valve repair kit without addressing the contaminant source will lead to immediate failure.
| Cause | Effect on Valve | Recommended Action |
| Contaminated Oil | Fine particles embed in the seals and score the precision surfaces of the spool and valve body bore. | Scored spools and rapid seal wear. |
| Damaged O-rings & Seals | Hardening, flattening, or cutting of the rubber seals allows pressurized fluid to bypass the spool (internal leak). | Pressure loss and fluid bypassing. |
| Excessive Back Pressure | Can push spools out of alignment or lead to premature spring failure. | Premature worn springs or spool misalignment. |
| Improper Assembly/Torque | Over-tightened bolts crush gaskets; under-tightened seals lead to leaks. | External leakage or binding. |
4. How to Rebuild a Hydraulic Control Valve (Step-by-Step)
This procedure focuses on replacing the seals and springs—the most common repairs covered by a standard hydraulic valve rebuild kit.
A. Preparation and Removal
Drain Hydraulic System: Shut down the machine. Depressurize the system and drain enough hydraulic fluid from the tank to prevent spills when disconnecting the valve.
Disconnect and Remove: Tag or label all hydraulic lines for correct reassembly. Disconnect the lines and control linkages. Remove the valve assembly from the machine.
Clean Exterior: Thoroughly clean the exterior of the valve with a non-flammable solvent to prevent external dirt from entering the internal porting during disassembly.
B. Disassembly and Inspection
Remove Spool Ends: Remove the bolts/caps holding the spool detents, springs, and end caps (glands) in place.
Extract Spools: Carefully slide the spools out of the valve body. Do not scratch the polished surface!
Inspect Wear: Inspect the spool surfaces and the exposed valve body bore. Look for deep scratches, pitting, or scoring.
Remove Old Seals: Use a plastic or brass pick (never steel) to remove all old O-rings, seals, back-up rings, and wiper/dust caps from the spool lands and end caps.
C. Install Rebuild Kit and Reassembly
Prep New Parts: Lubricate all new hydraulic control valve parts (O-rings, seals, back-up rings) from the hydraulic valve rebuild kit with clean hydraulic oil.
Install New Seals: Carefully roll the new seals into their respective grooves, ensuring they are not twisted or cut.
Install Spool Springs: Replace the spool springs (if included in the kit) as they can weaken over time.
Reassemble: Gently slide the spools back into their proper bore channels. Reinstall the end caps, detents, and springs.
Torque Tightening: Crucially, re-tighten the bolts to the manufacturer’s exact torque specifications to prevent leaks and binding.
D. Bleed and Test
Reinstall: Reconnect the valve to the machine and reconnect the hydraulic lines according to your tags.
Fill and Bleed: Refill the hydraulic reservoir with clean, new fluid. Run the engine and cycle all functions multiple times to bleed air from the cylinders and lines. Check for leaks.
6. Hydraulic Control Valve Rebuild Kits (What You Need)
A dedicated hydraulic control valve repair kit is essential because seals must be compatible with hydraulic fluid and rated for high pressure.
| Component | Purpose | Location |
| O-rings | Primary pressure sealing against internal and external leakage. | Spool glands, end caps, and mounting flanges. |
| Back-up Rings | Prevents O-rings from extruding under high pressure. | High-pressure side of O-rings. |
| Seals/Wipers | Prevents external contaminants (dust, water) from entering the spool bore. | Exposed ends of the spool (dust cap area). |
| Spool Springs | Returns the spool to the neutral position (if applicable). | Spool end caps/centering mechanisms. |
7. When to Repair vs. Replace
While seals can always be replaced, damage to the main valve body bore dictates replacement:
Repair Recommended: Symptoms caused by O-ring failure, weak springs, or minor external leaks. A new hydraulic valve rebuild kit is the cost-effective solution.
Replace Required: The primary reason for replacement is deep scoring or etching in the valve body bore. This precise surface is non-serviceable. If the spool is deeply scored, it can sometimes be replaced, but if the matching bore is scored, internal pressure loss will be permanent, and the entire valve body must be replaced. Replacement is also mandatory if the internal relief valve component fails and cannot be serviced independently.
❓ FAQ: Hydraulic Control Valve Repair
Q: Do I need to replace the springs in my rebuild kit?
A: Yes, if your kit includes them. Springs govern spool centering and relief pressure.10 Replacing them ensures the valve returns accurately to the neutral position and maintains correct system pressure.
Q: Can I use standard hardware store O-rings?
A: Absolutely not. Hydraulic systems use specialized high-pressure, heat-resistant, and chemical-resistant compounds (like Nitrile/Buna-N or Viton). Using standard rubber O-rings will lead to immediate failure and potential injury.
Q: What is the most important step in rebuilding a valve?
A: Cleanliness. Contamination is the number one killer of hydraulic components.11 Work on a clean surface and ensure all hydraulic control lever parts and openings are protected from dust and debris.