Why PIV Installation Accuracy Matters
In a fire emergency, every second counts. A Post Indicator Valve (PIV) must not only work perfectly but must be positioned so that fire departments can find and operate it instantly. Improper installation—whether it’s the wrong bury depth or incorrect distance from the building—can lead to system failure or NFPA compliance rejection.
This guide breaks down the post indicator valve installation detail based on NFPA 24 and industry best practices.
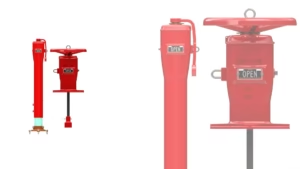
I. Post Indicator Valve Diagram & Components
To understand the installation, you must understand the assembly. A standard PIV valve assembly includes:
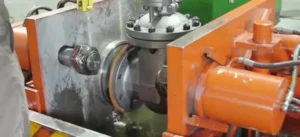
NRS Gate Valve: The buried shut-off valve (usually Resilient Wedge type).
Base Flange: Connects the indicator post to the valve bonnet.
Standpipe/Barrel: The telescopic housing that protects the stem.
Target/Indicator: The “OPEN” and “SHUT” signage visible through the window.
Operating Nut & Wrench: The interface for the fire department to turn the valve.

II. Strategic Location: Where to Place the PIV?
According to NFPA 24, the post indicator valve location is critical for safety:
Distance from Building: Ideally, a PIV should be located at least 40 feet (12 meters) away from the building it protects. This ensures that if the building collapses or is engulfed in flames, fire crews can still safely operate the valve.
Visibility: It must be placed in a location where it is not obstructed by landscaping, parked vehicles, or fences.
Protection: In high-traffic areas (like parking lots), bollards should be installed to protect the PIV from vehicular impact.
III. Step-by-Step PIV Valve Installation Detail
1. Determining the Bury Depth (Trench Depth)
One of the most common searches is for piv valve installation depth. The Trench Depth is the distance from the top of the pipe to the finished grade.
The Rule: Ensure you select a post with a telescopic range that matches your trench depth. Our posts typically offer a 3-foot to 20-foot adjustment range.
2. Setting the Valve
Place the NRS Gate Valve on a solid, level concrete pad (Thrust Block) to prevent settling.
Ensure the valve is in the fully open position during installation to prevent debris from damaging the seats.
3. Attaching the Indicator Post
Lower the indicator post onto the valve.
Pro Tip: Adjust the internal stem (telescopic rod) so that when the valve is closed, the “SHUT” target is perfectly centered in the window.
4. Backfilling
Backfill around the buried valve with gravel or clean fill to allow for drainage.
Compact the soil carefully around the standpipe to ensure the post remains perfectly vertical.

IV. Operation: Ensuring “Open or Closed” Clarity
A major point of inspection is the post indicator valve open or closed status.
Calibration: During installation, the “targets” must be calibrated. If the valve is slightly open but the window says “SHUT,” the system is a hazard.
The Window: Ensure the glass or polycarbonate window is clean and the seals are intact to prevent fogging, which can obscure the indicator during an inspection.
V. Maintenance & Compliance Checklist (NFPA 25)
Once installed, the PIV must be maintained under NFPA 25 standards:
Weekly/Monthly Inspection: Verify the valve is locked in the “OPEN” position.
Annual Operation: Fully close and re-open the valve to ensure the stem isn’t seized and the indicator targets move correctly.
Lubrication: Apply grease to the operating nut annually to prevent corrosion.
Conclusion: Get the Detail Right
Precision in post indicator valve installation is non-negotiable for fire safety. By following NFPA 24 guidelines and using UL/FM approved assemblies, you ensure your facility is protected and compliant.