Correct spring check valve installation is the difference between a silent, efficient system and one plagued by water hammer and premature valve failure. Because spring-loaded valves use mechanical assistance to close, they are more versatile than swing valves—but they still require precision during setup.
Follow this professional guide to ensure your installation meets industrial standards.
1. Pre-Installation Inspection
Before the valve even touches the pipe, perform these three checks:
Flow Direction: Look for the Directional Arrow embossed on the valve body. Installing a check valve backward will completely block your flow.
Spring Tension: Manually depress the disc (if possible) to ensure the spring moves smoothly and isn’t jammed by packaging debris.
Pressure Rating: Verify that the valve’s WOG (Water, Oil, Gas) rating exceeds your system’s maximum surge pressure.
2. Step-by-Step Installation Process
Step A: Orientation Selection
One of the biggest advantages of the spring-loaded check valve is that it can be installed in any orientation.
Horizontal: Standard installation.
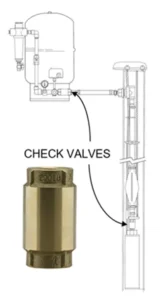
Vertical Upward: Ideal for preventing pump backflow.
Vertical Downward: Unlike swing valves, spring check valves can work here, provided the spring is strong enough to overcome the weight of the water column.
Step B: Piping Alignment
Ensure the upstream and downstream pipes are perfectly aligned. Forced alignment puts “piping stress” on the valve body, which can lead to seat leakage or a cracked valve housing over time.
Step C: Distance from Turbulence
Crucial Rule: To prevent “valve chatter” (rapid flapping), install the spring check valve at least 5 to 10 pipe diameters away from pumps, elbows, or throttled valves. Turbulent flow causes the spring to vibrate, wearing out the internal components prematurely.
3. Installation by Connection Type
Threaded (NPT/BSPT): Use high-quality PTFE tape or pipe dope. Use a wrench on the valve end closest to the pipe being tightened to avoid distorting the valve body.
Flanged: Use a “Star Pattern” (Criss-Cross) to tighten bolts. This ensures even pressure on the gasket and prevents seal failure.
Wafer Style: Ensure the valve is centered between flanges to prevent the disc from hitting the pipe wall when it opens.
4. Common Mistakes to Avoid
Over-Tightening: This can warp the valve seat, especially in brass or PVC valves.
Ignoring Debris: Always flush the lines before installing the valve. A single pebble or piece of weld slag trapped in the seat will cause the valve to leak.
Incorrect Spring Selection: If the “Cracking Pressure” of the spring is too high, your pump may overheat trying to push it open.
5. Maintenance & Testing
After spring check valve installation, perform a “System Prime.” Slowly increase pressure and listen for the “click” of the valve closing. If you hear a loud “slam,” check for air pockets in the line.
Conclusion: Reliability Starts with Installation
A spring check valve is an engineered solution for silent, backflow-free operation. By following these installation protocols, you protect your pumps and extend the lifespan of your entire piping network.