Proper installation of an anti-siphon sprinkler valve is non-negotiable for any irrigation system. It protects your family and community from water contamination due to backflow from your sprinkler lines—where chemical fertilizers, pesticides, or standing yard water might reside.
This guide covers the necessary steps for sprinkler anti siphon valve installation and how this common valve integrates into a simple sprinkler valve manifold setup.
I. Why Anti-Siphon Valves are Critical for Sprinklers
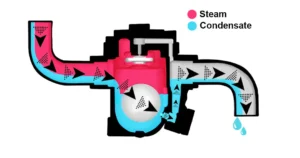
The anti siphon valve (or ASV) acts as a backflow preventer specifically designed for irrigation zones. When the irrigation system shuts off, the ASV automatically vents air into the downstream plumbing, which breaks any potential vacuum and prevents non-potable water from being sucked back into the main house supply line.
Key Compliance Rule: Height is Everything
By plumbing code, the anti-siphon valve must be installed at least 6 to 12 inches (15 to 30 cm) above the highest sprinkler head or the highest point of the irrigation zone it controls. If installed lower, it cannot effectively break the siphon.
II. Tools and Components for Sprinkler Manifold Installation
To successfully install anti siphon valve and set up a basic manifold, you will need:
New Anti-Siphon Valve(s): Match the size (3/4” or 1”) to your piping.
PVC Pipe and Fittings: Couplings, elbows, and T-connectors for the manifold.
PVC Primer and Cement.
Hacksaw or PVC Cutter.
Shovel (for valve box installation).
Valve Box (Optional, but recommended for protection).
III. Sprinkler Valve Manifold Installation Diagram
If you are installing irrigation valves for multiple zones, connecting them in a manifold is the most efficient method.

Step 1: Connecting to the Main Line
Shut Off Water: Turn off the main water supply to your irrigation system.
Cut Line: Cut into your main water line and install a T-fitting that branches off to the planned location for your manifold.
Step 2: Building the Manifold Structure
Assemble T-Fittings: Use PVC primer and cement to connect T-fittings, creating the parallel structure that will hold your valves. The T-fittings must be correctly spaced to accommodate the width of the valves.
Attach Valves: Glue or thread the anti-siphon sprinkler valves onto the manifold structure, ensuring the arrow on the valve body points in the direction of the flow (away from the main line).
Step 3: Installing the Anti-Siphon Valve (Crucial Placement)
Height Check: The entire manifold assembly must be positioned so that the highest point of the anti-siphon valve is at least 6 to 12 inches above the finished grade (ground level) and any sprinkler head in that zone.
Drainage: Ensure the valve is installed in a location that provides adequate drainage.
Step 4: Connecting the Zone Lines
Once the ASV is secured, connect the outgoing PVC pipe for each individual irrigation zone to the outlet side of the valve.
IV. Post-Installation and Troubleshooting
After the install sprinkler valve process is complete and the PVC cement has fully cured:
1. Pressure and Leak Check
Slowly turn the main water supply ON to the irrigation system.
Check the entire manifold and all new connections for leaks. A slow weep requires tightening or re-gluing; major leaks require immediate shutdown.
2. Valve Box Installation
While the anti-siphon valve itself must be above ground, the rest of the manifold (if side-mounted valves are used) can be placed in a valve box for protection.
3. Continuous Drip or Spray
If water continuously drips or sprays from the valve’s bonnet (the top cap) after the system shuts off:
Cause: This usually indicates a stuck plunger or a worn diaphragm/seal inside the valve, often due to sediment.
Fix: Before replacing the entire unit, try flushing the valve by manually turning the flow control screw slightly. If the problem persists, the internal bonnet assembly or diaphragm needs replacement.