Quick Answer
Your main water shut off valve controls all water entering your home. The valve is typically within three to five feet of where the main water enters, often in the basement near the front foundation wall. In warm climates, it may be outside. Knowing its location and how to operate it can prevent thousands of dollars in water damage during emergencies.
Most common locations: Basement (cold climates), exterior wall or curb box (warm climates), utility/mechanical room (slab homes).
What Is a Main Water Shut Off Valve?

Purpose and Function
The main water shut-off valve serves as the master control for your home’s water supply, letting you stop water flow to different fixtures as you assess the situation or call in a plumber.
Key functions:
- Stops all water entering your home
- Essential for plumbing emergencies
- Required for repairs and maintenance
- Prevents water damage during leaks
- Needed for winterization and renovations
Why Every Homeowner Must Know This
Emergency situations requiring immediate shutoff:
- Burst pipes (frozen or damaged)
- Major leaks in walls or ceilings
- Flooding from appliance failures
- Broken toilet supply lines
- Water heater ruptures
Non-emergency situations:
- Plumbing repairs or upgrades
- Replacing fixtures or appliances
- Home renovations
- Vacation/extended absence (freeze prevention)
- Water main work by utility company
The cost of not knowing: A burst pipe can release 400+ gallons per hour. At $4 per gallon for water damage restoration, that’s $1,600+ per hour in damages.
Where to Find Your Main Water Shut Off Valve
Inside Your Home

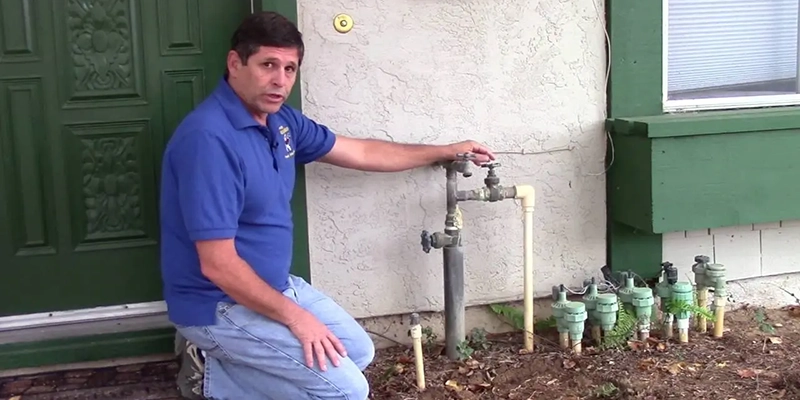
Basement (Most Common in Cold Climates)
The shut-off valve is typically located near the front foundation wall where the main water may come through the concrete floor or through the wall.
Where to look:
- Along interior foundation walls
- Near where pipe enters from street
- Usually 3-5 feet from entry point
- Often near the water meter
Visual markers:
- Large pipe (usually 3/4″ to 1″ diameter)
- May have round “wheel” handle or lever
- Often has water meter nearby
- Copper wire may connect across meter (grounding)
Alternative basement locations:
- In some cases, the main water may enter in a different area, like a mechanical room, up through the floor, near the water heater or furnace.
- Storage rooms
- Laundry areas
- Under stairs
Crawl Space
In houses with a crawl space, you’ll find the main water shutoff valve beneath it.
Access considerations:
- May require flashlight
- Watch for low clearance
- Check near where pipe enters foundation
- Often close to exterior wall facing street
Slab Foundation (No Basement)
The main water shutoff valve can usually be found in a mechanical room where the water heater is located, or under the kitchen sink.
Common locations:
- Utility/mechanical room
- Water heater closet
- Under kitchen sink
- Garage
- Laundry room
Homes with Fire Sprinkler Systems
⚠️ Special considerations: If your home has a fire sprinkler system, care is needed when selecting a shut-off valve. Unless it is a sprinkler pipe that is leaking, you should only shut off the plumbing supply and leave the sprinkler piping charged/live.
Two-valve system:
- First valve: Controls sprinkler system
- Second valve: Controls domestic plumbing (use this for general shutoffs)
- Second valve located downstream of sprinkler “tee”
Outside Your Home
Exterior Wall (Warm Climates)
In areas with warm climates, you’ll find the main water shut-off valve located on the exterior wall of your home since the temperature doesn’t fall below the freezing point.
Identification:
- Metal or plastic cover labeled water shut-off near ground level
- Often near outdoor faucet
- May be near washing machine hookups
- Close to where water meter is located
Why exterior in warm climates:
- No freezing risk
- Easier access
- Simpler installation
- Common in southern states
Property Line/Curb Box
In neighborhoods, a main shutoff valve is installed in each yard, covered by an access panel that can be easily lifted off.
Location characteristics:
- Between sidewalk and street
- Marked metal or plastic cover
- Flush with ground
- May be labeled “water” or “water meter”
- Usually within 5-10 feet of property line
What you’ll find inside:
- Water meter
- Curb stop valve (your shutoff)
- The water valve is located between the meter face and the curb
- Municipal shutoff (utility company’s valve)
Underground Meter Box
Typical setup:
Street → Municipal Valve → Water Meter → Your Curb Stop Valve → House
Access:
- Remove cover (may need screwdriver)
- Sometimes main water shut-off valves require a meter key
- Look for valve closest to your house
- It might be labeled “water meter” to help you identify it
Homes with Well Water
Wells usually have two main shut-off valves: a valve from the well to the pressure tank and another valve from the pressure tank to the plumbing.
Pressure tank locations:
- Basement
- Crawl space
- Garage
- Utility closet
- Near water heater (slab foundation)
Well locations:
- Outside in well house
- Underground utility box
- Near pressure tank
Which valve to use:
- Pressure tank valve: Most convenient for routine shutoffs
- Well valve: Use if concerned about freezing
- This valve directly regulates water flow from the well into your house
Can’t Find Your Valve?
Try these steps:
- Check property inspection report
- If this fails, the property inspection report should contain the location of the valve
- Often documented during home purchase
- Follow the pipes
- Find the water distribution system and trace it back to an exterior wall
- Look for largest pipe in home
- Follow from water heater backward
- Look for water meter
- Valve usually near meter
- Check both sides of meter
- Call your water utility
- They have records of service line location
- Can tell you typical locations in your area
- May send technician to help locate
- Ask neighbors
- Similar-age homes often have similar layouts
- Neighborhood patterns exist
- Hire a plumber
- You can also call one to help locate one you can’t find
- Plumbers familiar with local construction
Types of Main Water Shut Off Valves
1. Gate Valve

Identification:
- Gate valves typically have a round “wheel” handle
- Circular knob that turns
- Multi-turn operation (several full rotations)
- Often found in older homes
How it works:
- Features a circular or wheel-like handle, which you can rotate to lower or raise a metal gate inside the valve body
- Internal gate slides up (open) or down (closed)
- Fully open or fully closed (not for throttling)
Advantages:
- ✅ Durable and long-lasting
- ✅ Full flow when open (no restriction)
- ✅ Can last 30+ years
- ✅ Simple mechanical design
Disadvantages:
- ❌ Slow to operate (many turns)
- ❌ Could be difficult to move if it hasn’t been turned in ages
- ❌ Gate can corrode and stick
- ❌ May leak after years of non-use
- ❌ No visual on/off indication
Operation:
- Round “wheel” handle valves will turn off by turning the handle clockwise. It may take two or more full revolutions.
- Turn until resistance increases (fully closed)
- Don’t force past resistance
2. Ball Valve (Quarter-Turn)
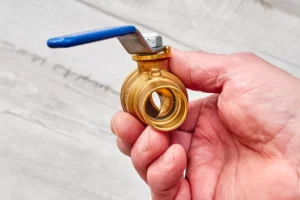
Identification:
- Lever handle (looks like lever on faucet)
- Newer homes usually feature a ball valve with a lever
- Single quarter-turn operation
- Plastic or metal body
- Clear on/off position
How it works:
- Ball with hole through center
- Lever rotates ball 90 degrees
- Hole aligns with pipe (open) or perpendicular (closed)
- Instant on/off
Advantages:
- ✅ Fast operation (one quarter-turn)
- ✅ Visual on/off indicator (lever position)
- ✅ Rarely sticks or corrodes
- ✅ Reliable even after years of non-use
- ✅ Full flow when open
- ✅ Longer lifespan than gate valves
Disadvantages:
- ❌ More expensive initially
- ❌ If handle breaks, harder to operate
Operation:
- Slowly turn level handle valves ¼ turn, until the handle is not parallel with the pipe
- All that’s needed is an easy quarter turn of its lever handle so that it stands crosswise to the pipeline effectively shutting off the water supply
- Parallel to pipe = OPEN
- Perpendicular to pipe = CLOSED
Why ball valves are superior:
- Modern building codes often require them
- More reliable over time
- Easier for anyone to operate
- Visual confirmation of position
3. Globe Valve
Identification:
- Round handle (similar to gate valve)
- Bulbous body shape
- Less common in modern homes
- Usually brass construction
How it works:
- Internal disc moves up and down
- Compresses against valve seat
- Can throttle flow (partial opening)
- Good for flow control
Advantages:
- ✅ Can regulate flow (not just on/off)
- ✅ Good shutoff seal
- ✅ Easier to repair than gate valve
Disadvantages:
- ❌ Restricts flow even when fully open
- ❌ Higher pressure drop
- ❌ Not ideal for main shutoff
Where still used:
- Older homes
- Applications needing flow control
- Secondary valves
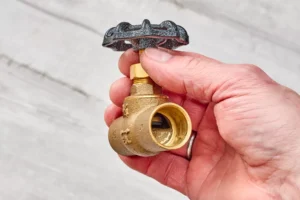
4. Angle Stop Valve
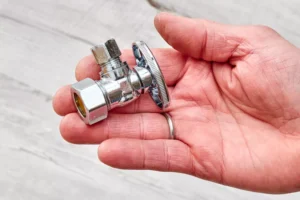
Identification:
- 90-degree angle design
- Input and output at right angles
- Often chrome-plated
- Small size
Where found:
- Under sinks (fixture shutoffs)
- Behind toilets
- Washing machine connections
- Water heater connections
Note: Rarely used as main house shutoff, but common for individual fixtures.
5. Curb Stop Valve (Street Valve)

Identification:
- Located underground at property line
- A special key is sometimes needed to turn the water off
- Long shaft extends from valve to ground level
- Square or pentagonal top for meter key
How it works:
- Similar to gate valve internally
- Operated with long-handled meter key
- Accessed through curb box opening
Ownership:
- Curb stop: Usually homeowner’s responsibility
- Municipal valve: Utility company’s property
- Check local regulations
Operation:
- Use your water shut off key to slowly turn the valve until the arrow is pointed at the curb
- When the arrow is pointed at the curb, the water has been shut off
How to Shut Off Your Main Water Valve
Before You Start
Preparation:
- Locate valve ahead of emergencies
- Test operation twice yearly
- Have tools ready (meter key if needed)
- Know valve type
- Every resident in a home should know where to find the main water shut-off valve and how to turn off water in case of an emergency
Tools you may need:
- None (hand operation for most valves)
- Meter key (for curb stop)
- Adjustable wrench (if valve tight)
- Flashlight (for dark locations)
- Work gloves (for grip and protection)
Shutting Off Inside Valve
For Gate Valves (Round Handle):
Step 1: Identify the valve
- Verify it’s the main valve (not a branch line)
- Check valve type
Step 2: Turn clockwise
- Slowly rotating its wheel-shaped handle in a clockwise direction until there is no more water running
- Turn steadily, not jerky
- Count rotations (helpful for reopening)
Step 3: Stop at resistance
- Stop turning as soon as you encounter any resistance to avoid causing damage
- Don’t force beyond natural stop
- Typical: 5-10 full turns
Step 4: Verify shutoff
- Open a tub or sink faucet (hot and cold) on the highest level of the home to relieve pressure, and watch that spout to ensure that water has stopped flowing
- Water may run briefly (from pipes)
- Should stop within 30 seconds
For Ball Valves (Lever Handle):
Step 1: Identify current position
- Lever parallel to pipe = OPEN
- Lever perpendicular to pipe = CLOSED
Step 2: Turn one quarter turn
- Rotate lever 90 degrees
- From parallel to perpendicular
- Should move smoothly
Step 3: Verify closed position
- Lever should point across pipe
- Clear visual confirmation
- Test faucet to confirm
Shutting Off Outside/Curb Box Valve
Step 1: Remove cover
- Look for a round or rectangular metal cover flush with the grass or sidewalk
- Use screwdriver to pry if stuck
- Set cover aside safely
Step 2: Clear debris
- Remove dirt, leaves, or water
- After you clear any dirt or debris off the valve, you’ll see an arrow on the top that displays the direction of the flow of water
- Locate valve closest to house
Step 3: Insert meter key
- With the cover removed, look inside and locate the water valve shut off (the one positioned closest to your house)
- Long-handled tool with fitting on end
- May need to reach down 3-4 feet
Step 4: Turn clockwise
- Whatever tools you use, turn the valve clockwise all the way to bring the water flow to a standstill
- May be very stiff (hasn’t moved in years)
- It takes a fair bit of leverage to turn off the valve and the water shut off key provides that
Step 5: Verify and replace cover
- Check indoor faucet
- Replace cover securely
- Note: May need utility permission
After Shutting Off Water
Immediate steps:
- Relieve pressure
- Open a tub or sink faucet (hot and cold) on the highest level of the home to relieve pressure
- Open both hot and cold sides
- Highest fixture in house
- Drain system if needed
- Continue to open faucets throughout the home to drain-down as needed
- Open lowest faucet
- Flush toilets
- Run until no water flows
- Protect water heater
- Be sure to de-energize the water heater and boiler where applicable by shutting off power to electric water heaters and any type of boiler
- Electric: Turn off breaker
- For gas water heaters, turn thermostat down to the pilot-only setting
- Prevents dry-firing damage
- Alert household
- Inform everyone water is off
- Post note on bathroom mirrors
- Explain expected duration
Turning Water Back On
Proper procedure:
- Close all faucets
- Shut every open faucet
- Check dishwasher, washing machine
- Verify toilet tanks
- Turn valve slowly
- Open gradually (avoid water hammer)
- Listen for rushing water
- Watch for leaks
- Purge air from lines
- Open faucets one at a time
- Start with lowest level
- Let water run until steady
- May sputter initially (air)
- Check for leaks
- Inspect all fixtures
- Check valve itself
- Look for ceiling/wall dampness
- Verify toilet seals
- Re-energize water heater
- Confirm tank is full
- Restore power/gas
- Wait 30-60 minutes for heating
Troubleshooting Common Problems
Problem 1: Valve Won’t Turn
Causes:
- Years of non-use (corrosion)
- Mineral buildup
- Rusted internal parts
- Wrong direction
Solutions:
Try these first:
- Verify turning correct direction (clockwise = off)
- Apply penetrating oil (WD-40, PB Blaster)
- Wait 15-30 minutes for oil to penetrate
- Try again with more leverage
If still stuck:
- Use larger wrench or pliers
- Apply gentle back-and-forth motion
- Don’t force (can break valve)
- Call plumber if won’t budge
Prevention:
- Exercise valve twice yearly
- Turn off and back on
- Prevents seizing
Problem 2: Valve Leaks When Turned
Causes:
- Worn packing nut
- Corroded valve stem
- Gate or ball deteriorated
- Normal in very old valves
Temporary fix:
- Tighten packing nut (under handle)
- May slow or stop drip
- Not a permanent solution
Permanent solution:
- Replace valve
- Professional job (requires shutoff at street)
- Cost: $200-500 typically
Problem 3: Valve Won’t Close Completely
Symptoms:
- Water still flows at faucets
- Reduced flow but not stopped
- Hissing sound at valve
Causes:
- Corroded valve internals
- Gate valve debris
- Worn valve seat
- Mineral buildup
What to do:
- Try closing/opening several times (may clear debris)
- If persistent, valve is failed
- Must use street valve for full shutoff
- Schedule valve replacement
Problem 4: Water Meter Still Running
Check this:
- You can open it with a screwdriver and read the meter inside. Whether it’s digital or analog, if the main is turned off, then the meter should stop running. If you’re positive you’ve correctly shut off the main but the meter is running, you likely have a water leak
Possible causes:
- Leak between meter and valve
- Underground leak
- Toilet running
- Irrigation system on
Problem 5: Handle Breaks Off
Immediate action:
- Don’t panic—water won’t escape
- Valve body still functional
- Use pliers on valve stem
- Turn stem directly
Permanent fix:
- Replace handle (hardware store)
- Or replace entire valve
- Inexpensive repair
Maintenance and Testing
Regular Maintenance Schedule
Every 6 months:
- Locate and visually inspect valve
- Exercise valve (open/close cycle)
- Check for leaks around packing nut
- Verify handle operates smoothly
- Clean curb box (if applicable)
Annually:
- Full operation test
- Apply lubricant to gate valve threads
- Check water meter before/after test
- Inspect for corrosion
- Update family on location
Every 5 years:
- Consider professional inspection
- Evaluate valve condition
- Plan replacement if >20 years old
How to Exercise Your Valve
Why it’s important:
- Prevents seizing
- Keeps internal parts lubricated
- Ensures valve works in emergency
- Removes minor buildup
Proper procedure:
- Alert household (water will stop briefly)
- Turn valve to closed position
- Wait 30 seconds
- Open one faucet to verify shutoff
- Turn valve back to open
- Let faucet run until steady
- Close faucet
- Note date on valve tag
How often: Every 6 months minimum
Signs You Need a New Valve
Replace valve if:
- Over 25-30 years old
- Leaks when operated
- Won’t close completely
- Handle broken or stripped
- Visible heavy corrosion
- Doesn’t hold closed position
- Required by local code upgrade
Replacement cost:
- DIY: $30-100 (valve only)
- Professional: $200-500
- Includes street shutoff
- May need permit
Upgrade opportunity:
- Replace gate valve with ball valve
- Add second valve for easier access
- Install valve with drain port
- Improve accessibility
Emergency Situations
Burst Pipe Emergency
Immediate actions (in order):
- Shut off main valve (first priority)
- Shut off water heater
- Open faucets to drain
- Move valuables from water
- Document damage (photos)
- Call plumber
- Call insurance company
If valve won’t work:
- Shut off at street/curb box
- Call water utility if needed
- Use buckets to contain water
- Turn off electricity if water near outlets
Can’t Find or Operate Valve
Emergency alternatives:
- Try fixture shutoffs
- You don’t always need to access the residential main water shut off valve outside and cut off water to the whole house! You can turn the valve behind the appliance or fixture that’s giving you trouble
- Under sinks
- Behind toilets
- At water heater
- Call water utility
- Emergency number (often 24/7)
- They can shut off at street
- Response time varies
- Call emergency plumber
- Can locate and operate valve
- May need to break in to curb box
- Can install new valve if needed
Frozen Pipe Situations
Before shutting off water:
- If pipes already frozen, shutting off won’t help
- May trap expansion when thaws
- Consult plumber first
If shutting off for extended absence:
- If frozen pipes are a concern, drain the pipes by running all the faucets and flushing all toilets until there is no more water
- Complete drainage essential
- Consider antifreeze in traps
- Insulate exposed pipes
Individual Fixture Shutoff Valves
Why They’re Important
While this guide focuses on main shutoffs, individual fixture valves are equally important for:
- Minor repairs without whole-house shutoff
- Toilet or faucet replacement
- Appliance servicing
- Isolating single-fixture leaks
Common Locations
Kitchen:
- Before you repair or replace a faucet, turn off the water supply—twist the valve under the sink clockwise
- Two valves (hot and cold)
- Under sink
Bathrooms:
- Under each sink (2 valves)
- Behind toilet on wall (should be located on the wall behind the toilet)
- Shower/tub (access panel or basement)
Laundry:
- If the washer hose starts leaking or the appliance overflows, limit water damage by pulling the unit away from the wall and turning the shut-off valve behind it
- Two valves (hot and cold)
- On wall behind washer
Water Heater:
- Cold inlet valve (top of heater)
- Sometimes hot outlet valve
- Gas heaters also have gas valve
When to Use vs. Main Valve
Use fixture valve:
- Single fixture leaking
- Routine maintenance/repair
- Replacing fixture
- Appliance servicing
Use main valve:
- Can’t locate fixture valve
- Multiple fixtures affected
- Pipe leak in wall
- Major plumbing work
- Emergency flooding
Special Situations
Condos and Apartments
Typical setup:
- Building main shutoff (maintenance access only)
- Unit shutoff valve (your responsibility)
- Usually in utility closet or near water heater
What you can control:
- Water to your unit only
- Individual fixture valves
- Cannot shut off building water
Who to call:
- Building maintenance for main issues
- Your plumber for unit issues
- Property manager for access
Multi-Family Homes
Understanding your system:
- May have shared main valve
- Each unit might have submeter
- Coordination with other units needed
Best practice:
- Know location of your unit’s valve
- Post emergency contact info
- Communicate with neighbors before shutoffs
Mobile Homes
Valve locations:
- Often under home exterior
- May be in utility compartment
- Sometimes in skirting access panel
Special considerations:
- More vulnerable to freezing
- May need heat tape
- Easier access usually
Vacation Homes
Essential precautions:
- Shut off main valve when away
- Drain all pipes completely
- Leave cabinet doors open
- Set heat to 55°F minimum
- Have neighbor check periodically
Winterization procedure:
- Shut main valve
- Open all faucets
- Flush toilets multiple times
- Drain water heater
- Pour antifreeze in drains/toilets
- Document process
Frequently Asked Questions
Where is the main water shut off valve in my house?
The shut-off valve is typically located near the front foundation wall in basements, within three to five feet of where the main water enters. In homes without basements, check the utility room, garage, or under the kitchen sink. In warm climates, it may be outside on an exterior wall or in an underground box near the street.
How do I know if my water valve is completely off?
Open a tub or sink faucet (hot and cold) on the highest level of the home and watch that spout to ensure that water has stopped flowing. Water may run briefly from pipes, but should stop within 30 seconds. If water continues flowing, the valve isn’t fully closed or may be defective.
Can I shut off the water valve at the street myself?
In most areas, homeowners can access their curb stop valve (the one closest to your house), but not the municipal valve. However, some jurisdictions prohibit homeowner access. Check local regulations. You’ll need a meter key (available at hardware stores) to operate the curb stop valve.
What if my main water valve won’t turn?
Try applying penetrating oil and waiting 15-30 minutes before attempting again. Use gentle back-and-forth motion rather than forcing. If it still won’t move, don’t force it—you could break the valve. Call a plumber or shut off water at the street curb box instead.
How often should I test my main water shutoff valve?
Test your valve at least twice per year by turning it off and back on. This “exercising” prevents the valve from seizing due to corrosion or mineral buildup. Always alert household members before testing, as it will temporarily shut off all water.
Do I need to drain my pipes after shutting off the main valve?
For routine repairs, minimal drainage is needed—just open a high faucet to relieve pressure. For extended shutoffs (vacation, winterization), drain completely by opening all faucets, flushing toilets, and draining the water heater to prevent freezing damage.
Who owns the water shutoff valve?
Homeowners typically own the valve inside their home and the curb stop valve at the property line. The utility company owns the municipal valve nearest the street. Maintenance responsibilities vary by location, so check with your water utility for specific ownership boundaries.
Can a faulty main valve cause low water pressure?
Yes. A partially closed or corroded gate valve can restrict flow and reduce pressure throughout your house. Ball valves rarely cause this issue because they’re fully open or fully closed with no in-between positions. If low pressure started after valve operation, check that it’s fully open.
Should I replace my old gate valve with a ball valve?
Yes, when replacement is needed. Ball valves are superior for several reasons: quarter-turn operation, visual on/off indication, better reliability, and less likely to stick. Modern building codes often require ball valves for new installations. Replacement typically costs $200-500 professionally installed.
What should I do if water is still running after I turn off the main?
First, verify you’ve turned the correct valve and it’s fully closed. If water continues, you may have a leak between the street and your main valve, or the valve may be defective. Shut off water at the curb box and call a plumber immediately. Check your water meter—if it’s still running, you definitely have a leak.
Conclusion
Knowing your main water shut off valve location and how to operate it is one of the most important aspects of home ownership. Water gushing from a broken or frozen pipe can cause substantial damage inside the dwelling, but quick action can minimize damage and save thousands of dollars.
Key takeaways:
Location:
- ✅ Most homes: basement near front foundation wall
- ✅ Slab homes: utility room, garage, or under kitchen sink
- ✅ Warm climates: exterior wall or underground curb box
- ✅ Well homes: near pressure tank
Operation:
- ✅ Gate valves: Turn clockwise multiple times
- ✅ Ball valves: Quarter-turn (lever perpendicular to pipe)
- ✅ Always turn slowly to avoid water hammer
- ✅ Test every 6 months to prevent seizing
Maintenance:
- ✅ Exercise valve twice yearly
- ✅ Consider replacing gate valves with ball valves
- ✅ Replace valves older than 25-30 years
- ✅ Keep meter key accessible for curb box valves
Emergency preparedness:
- ✅ Ensure every adult knows valve location
- ✅ Keep path to valve clear
- ✅ Post location sign for visitors/emergency responders
- ✅ Have plumber’s number readily available
Take 10 minutes today to locate your main water shutoff valve, test its operation, and inform household members of its location. This simple preparation could save you from thousands of dollars in water damage and give you peace of mind knowing you’re prepared for plumbing emergencies.